

I was recently assigned a journaling project on transcendentalism for my AP Lang/Am Lit class. My teacher informed us that going above and beyond would earn us bonus points; those who turned in projects exceeding the requirements would finally get some credit for doing so. As she was explaining the assignment, I couldn’t help but thing of this blog, and how it was about time for me to post again. Surely somehow I could merge the two.
After considering what transcendentalism was and different ways I could show that in the very foundation of my work, I decided the best thing for me to do would be to limit the resources I use and recycle some paper. Going through my closet I found an old paper recycling factory kit from when I was little. It was perfect! I could learn the basics of making paper, and recycle old schoolwork from years past. One of my dad’s majors in college was paper science, so he was a big help too.
I know with this post I have strayed a little bit from what I usually do in the fact that I didn’t do all of this with things you may have as well. I cheated a little bit with my kit. However, I didn’t completely follow the kit, and it’s relatively easy to make your own.
One more thing to keep in mind with this project: it’s slow going. This would be perfect for a rainy weekend, and is easy enough to do with kids. Plus it’s great for projects or handmade cards.
Okay now to get into what you’re going to need.
- Stack of old paper (I used schoolwork from a few years ago.)
- Old blender or a bowl and a lot of patience (This is for making the pulp. I recommend an old blender in case the ink bleeds into it.)
- Container to hold the pulp in (I used a large butter tub)
- Deckle (This is essentially a frame with non-metal mesh attached to the bottom. Feel free to make your own or purchase one online. Mine came with the kit.)
- Tray deep enough to submerge your deckle.
- 2+ pieces of felt or thick cloth (Try to find something without much texture, and that is the same size or bigger than the paper you are making)
- Sponge or washcloth (helps absorb water out of your paper)
- Press (Again, mine came with the kit. It broke halfway through and I learned that two flat surfaces and some elbow grease works just as well.
- Area to lay out your paper to dry (I started by laying them on cloths and after they sat overnight we put them on cookie racks.)
- Plastic work mat (Your table is going to get wet.)

Let’s get messy!
 Crumple about 3 or 4 sheets of paper into your blender and add a cup or so of water. Blend on the pulse setting. If it seems stuck and doesn’t want to blend, try adding more water. That usually works for me.
If you are not using a blender, tear up a bunch of paper into little pieces and soak them in warm water for at least two hours. Stir this until you get a mushy pulp.
 This is about what it should look like after blending. I found that most of the time it turned out a pretty purple color. One page had green marker which turned that whole batch green. Pour your slush into your container and repeat.
 I filled my bucket all the way up and chose to stop there. You can make as much or as little as you would like. The chopstick is pictured because I found it useful to push some stubborn paper closer to the blades every once in a while.
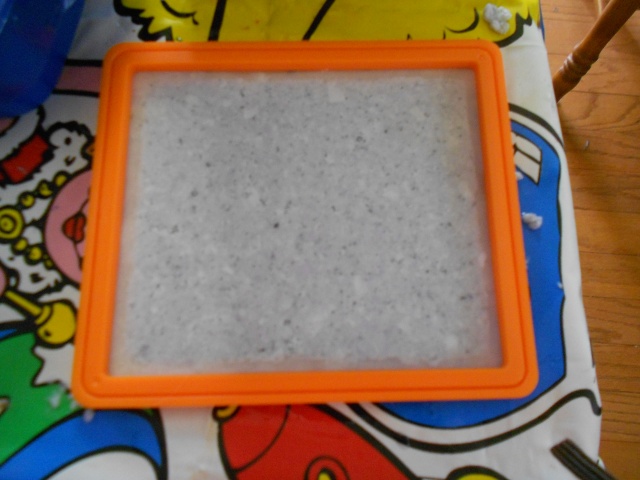
 Now we will start forming the paper. Take some handfuls and spread it out in your deckle. Don’t worry about it being perfect.
 Swirl it around in your tray full of water to evenly spread out the pulp. It’s okay for some to come out. You may decide at this point to remove or add pulp to get the consistency you want.
 Place a sheet of felt over the deckle.
 Carefully flip it over so that the paper is between the felt and the mesh screen, with the mesh facing upwards.
 Using your washcloth or sponge, press down on the mesh and absorb as much water as you can. The more water you get out of it, the less time it will take to dry.
 Remove the washcloth and deckle and place the felt on the bottom layer of your press. If you are making your own, just make sure it is flat and waterproof. Sorry this picture is blurry!
 Place your second felt on top.
 Add the second layer of your press. This one has screws to tighten down the top layer, that is, until I tightened a little too much and broke it. Plan B ended up being just setting the top layer on and pushing down really hard to squish the water out.
 Remove the paper from the press and take off the top layer of felt. Use the bottom layer of felt to transition the paper on to where you are drying it. Continue making paper until you run out of slush. It’s slow going, but I found it to be pretty fun.
 This is my paper in the afternoon. We laid some of it on cookie racks once it could hold its shape and it dried much faster. You can also use a hair dryer if you are in a hurry but that is very tiring on the arms.
 I thought it was interesting how the wet paper was purple, but it dried white. I couldn’t help but think of the Elmer’s glue sticks that go on purple and dry clear!
As always, have fun and feel free to get creative with this project! Add color, or even flower seeds to add an extra layer of transcendentalism. I found some books on the subject and figured that they would be perfect for an outdoor, back to nature photo shoot. Even my dog, Cinnamon, wanted to join in!


Thought it. Might be fun to bind them together and make a journal
LikeLike
That’s the plan! I have a whole Pinterest board dedicated to book binding
LikeLike